Wednesday, June 5, 2013

Loaded chocolate chip cookies

Loaded chocolate chip cookies

It seems strange to say this but I'm not a huge chocolate chip cookie fan. My mother never made them when I was growing up. When I was given a warm gooey chocolate chip cookie right out the oven, I was satisfied but never blown away by it. Several years ago I read an article in the New York Times about baking the best chocolate chip cookies from scratch. They key was to let the dough sit for over 24 hours to allow the sugars time to dissolve into the butter. I was intrigued. Perhaps this would yield a chocolate chip cookie I would love. Though curious, I never tried the NY Times recipe.

Years later I stumbled upon the "perfect" chocolate chip recipe in Cooks Illustrated and couldn't say no. I followed the recipe exactly and got rave reviews. The cookies were crisp on the outside but moist and chewy on the outside. During one prep, I realized I didn't have enough semi-sweet chocolate chips and rather than make a trip to the store, decided to add things I had in the pantry. White chocolate, dark chocolate, toffee bits, walnuts went in instead of the semi-sweet chocolate chips. Top with coarsely ground sea salt and some addictive cookies were born.

I love Cooks illustrated as they explain why certain steps and ingredients result in differences in the final results like using more brown sugar that granulated sugar gives the cookie a chewier texture than using equal amounts of both sugars and browning the butter enhances the flavor. The recipe from Cooks Illustrated with my comments and modifications in blue is below.

Ingredients
1-3/4 cups unbleached all-purpose flour
1/2 tsp baking soda (confirm it's not expired)
14 tbsp unsalted butter
1/2 cup granulated sugar
3/4 cup packed dark brown sugar (light brown sugar is ok. If your sugar is )
1 tsp salt
2 tsp vanilla extract
1 large egg
1 large egg yolk
1-1/4 cups semi sweet chocolate chips or chunks (I basically use 1-1/4 cups total of whatever chips I want to add to the cookies with relatively equal amounts of each)
3/4 cup chopped pecans or walnuts, toasted (optional)
coarse sea salt

Directions
1. Adjust oven rack to middle position and head to 375°. Line 2 large (18" x 12") baking sheets with parchment paper. Whisk the flour and baking soda together in a medium bowl and set aside.
2. Heat 10 tbsp butter in a 10" skillet over medium-high until melted, about 2 minutes. Continue cooking, swirling the pan constantly until butter is dark brown and has a nutty aroma, 1 to 3 minutes. Remove skillet from heat and, using heatproof spatula, transfer browned butter to a large heatproof bowl. Stir the remaining 4 tbsp of butter until completely melted.
Browned butter - if you use a nonstick skillet, you can't really tell when it starts to brown
3. Add both sugars, salt, vanilla to the bowl with butter and whisk until fully incorporated. Add egg and yolk and whisk until mixture is smooth with no sugar lumps remaining, about 30 seconds. Repeat the process of resting and whisking 2 more times until mixture is think, smooth and shiny, Using rubber spatula or wooden spoon, stir in flour mixture until just combined, about one minute. Stir in chocolate chips and nuts, if using, giving the dough a final stir to ensure no flour pockets remain.
Sugar, vanilla, salt, and butter mixture

Initial whisk with egg and egg yolk
Final whisk with egg and egg yolk. It is slightly shinier than the initial whisk but the key thing to note is it's much smoother
Dough prior to chocolate chip addition
4. Divide dough into 16 portions, each about 3 tbsp (or use #24 cookie scoop). Arrange 2" apart on prepared baking sheets. Sprinkle some coarse sea salt on top - don't go too crazy. 

A 3 tbsp cookie is a nice sized cookie. If you're looking for a nice balance of both, I'd stick with the recommended 3 tbsp portion. I've tried decreasing the portions to 1 and 2 tsbp sizes to maximize the number of cookies. Sometimes 16 cookies just isn't enough for a gathering. Keeping the same temperature and reducing the baking time by 1 - 2 minutes gave me a more crisp cookie while decreasing the oven temp to 350º and making until slightly golden brown gave a more chewy cookie. 
I usually sprinkle a bit of coarse sea salt on top 
5. Bake cookies 1 tray at a time until cookies are golden brown and edges have begun to set but centers are still soft (10 to 14 minutes, rotating the baking sheet halfway through baking. Transfer baking sheet to wire rack; cool cookies completely before serving.
Fresh out of the oven
The edges are slightly crispy but the center is soft and chewy


Monday, May 27, 2013

Hefeweizen Cupcakes

Hefeweizen Cupcakes

My husband and I found ourselves with a lot of beer leftover from our reception, which was nearly a month ago. Rather than drinking all the beer (we did give a decent amount away to friends and family), I've been incorporating it into my cooking and baking with mixed results. My beer bread turned out delicious but my blueberry beer cinnamon rolls weren't very cinnamon roll-like. I managed to salvage my second attempt by turning them into a blueberry beer coffee cake. Today I decided to try hefeweizen beer cupcakes! I've made beer cupcakes before using stout and chocolate but not hefeweizen. There were a few recipes out there but I chose one from the Pyramid brewery since I had Pyramid hefeweizen.

I was pleasantly surprised with the cupcakes. They were very moist and only slightly sweet. I personally don't like the super sweet cupcakes or frosting. I didn't have any cardamon on hand so I substituted cinnamon in without any problems. I would definitely make these again with cardamon to see how different it tastes. As for the frosting, I ran out of lemons so I substituted with some orange zest. The recipe from Pyramid is below with my notes in blue.

Cupcake Ingredients
6 tbsp butter, melted
2 eggs, room temperature4 oz buttermilk6 oz Pyramid Hefeweizen2 tsp vanilla1 cup brown sugar2 cups flour1 tsp cardamom (didn't have cardamon but substituted cinnamon)1 tsp baking soda

1) Preheat oven to 350 degrees.
2) Melt butter and set aside to cool down.
3) Whisk together the eggs, buttermilk, beer, vanilla in one bowl, and mix together the sugar, flour, cardamom, and baking soda in another.
4) Add the dry ingredients to the wet ingredients in two parts, using a mixer to combine. Add the melted butter and combine.
5) Pour batter into cupcake cups and bake for 18-20 minutes, or until a toothpick inserted comes out clean. Let cool.


Lemon Cream Cheese Butter cream Ingredients
4 oz butter (room temp.)
4oz cream cheese (room temp.)
1 tsp lemon extract 
(didn't have lemon extract so I added ~1tbsp of orange juice and zest of 1 orange - husband said frosting slightly remind him of a creamsicle but thought it tasted ok with the cupcake)
3 cups powdered sugar 
(I probably used about 1-1/2 cups since I hate overly sweet frosting)
3 drops yellow food coloring 
(I skipped this since I used the orange zest)


1) Cream butter and cream cheese with mixer until smooth. Slowly add the powdered sugar about a ½ cup at a time. When mixed add flavor and food coloring.
I originally tried a citrus whipped cream topping but it was a bit too light for the cupcake.
Frosted with orange butter cream with bits of orange zest
Nice moist cupcake... would probably work as a layered cake


Saturday, May 25, 2013

Mango banana waffles


Mango Banana Waffles


I woke up this morning craving waffles but realized I had 1 ripe banana and several ripe mangoes in the house. Would mango banana waffles work? A quick internet search said yes. There were indeed others making mango waffles, some with bananas. The concept was simple - add mango and banana to waffle batter, add batter to waffle maker, and voila! Mango banana waffles!

I decided to use the recipe posted on My Love for Cooking as a starting point. It had good reviews and the waffle batter was similar to those I've used in the past. I did make a few minor adjustments (which I've indicated in blue). This recipe gave me ~4 large waffles using ~1 cup of batter per waffle with my waffle iron.

Ingredients
1¼ cup All purpose flour
½ cup White Whole wheat flour
3 Tbsp Ground Flax Meal (I didn't have flax meal and though almond flour would add a nice nutty dimension but I was out of that too so I substituted an equal amount of oat flour)
1 Tbsp Baking Powder
⅛ tsp Salt
1⅔ Cup Milk (I suggest Coconut)
2 Tbsp Sugar, Brown Sugar or honey (I used raw agave nectar - no particular reason)
3 Tbsp Vegetable oil
2 Large Eggs
2 Champagne Mangoes (or one regular one)
1 ripe banana
butter or cooking spray for waffle iron, if needed
Powdered sugar, syrup, and/or whipped cream for waffles (per your tastes - I thought it was sweet enough with the fresh fruit on top)

Directions
1) Heat up your waffle iron per the manufacturer's instructions.
2) Wash, peel and dice both mangoes. Set aside half for garnish. (I diced one mango and sliced the second for garnishing)
3) Dice 1/2 of the banana and slice the remaining half for garnish. Alternatively you can dice the whole banana.
I thought about making a puree for more uniform fruit flavor throughout the waffle but wanted to get bites of fruit chunks instead.
4) Combine the flours, flax meal, baking powder and salt in a large bowl.
5) Combine the milk, sugar/honey, eggs and vegetable oil in a separate bowl. I find it easier to mix the eggs first, and then add the other ingredients.
6) Add the wet ingredients to the dry ingredients until combined. Do not over-mix. The batter is about the consistency of pancake batter, maybe slightly thicker.
7) Fold in the diced mango (just 1 mangoes-worth) and diced banana.
8) Add the recommended amount of batter to your waffle iron. Waffle is done with golden brown. Mine took ~2 minutes per side. (I use this time to clean up the dirty bowls and make coffee).
9) Garnish with remaining diced mangoes, sliced bananas and whatever you'd like to top your waffles with. I do suggest tasting the waffle before adding any powdered sugar or syrup. I used fairly ripe mangoes and bananas so the waffle was sweet enough for me as is.


Since I was making breakfast for myself, I garnished with extra fruit and ate what I didn't use.
Waffle texture was crisp on the outside and spongy on the inside
I love getting those warm gooey chunks of banana
Tasty bits of mango

Wednesday, May 8, 2013

Beer Bread

Beer Bread

Yes... beer bread. We had some leftover Blue Moon Agave Nectar Beer that some friends brought over and since it wasn't the type of beer we typically drink, I decided to bake some bread. The concept isn't a new one (beer bread or baking beer bread to get rid of unwanted beer). My first experience was a loaf of Sam Adams Cherry Wheat Beer which turned out well considering my dislike of cherry-flavored foods. So why beer bread? One bottle of beer makes a single loaf of bread in a little over an hour. Yep, it takes virtually no time to prep and about an hour to bake. Homemade bread without waiting for the dough to rise or any kneading.

I used this recipe from Food.com and swapped out the sugar for some raw agave nectar. My modification to the recipe is in blue but it's a nice basic recipe that can be easily modified with ingredients that compliment the flavor of your beer. I substituted 1/3 of the flour with wheat flour when I made the Cherry Wheat Beer bread.

3 cups flour (sifted Don't be lazy, just do it... even if it came pre-sifted)
3 teaspoons baking powder (omit if using Self-Rising Flour)
1 teaspoon salt (omit if using Self-Rising Flour)
1/4 cup sugar (I substituted this with ~3 tbsp of agave nectar)
1 (12 ounce) can beer (warm to room temp first)
1/2 cup melted butter (1/4 cup will do just fine)

Directions:

1) Preheat oven to 375 degrees.
2) Mix dry ingredients and beer. (I tried not to overmix this so it was fairly lumpy when I transferred it to the loaf pan)
3) Pour into a greased loaf pan. 
4) Pour melted butter over mixture. (I added 6 x 1/4" squares of butter on top rather than the 1/4 - 1/2 cup)
5) Bake 1 hour, remove from pan and cool for at least 15 minutes. (I baked mine for ~50 minutes and pulled it out of the oven after it passed the toothpick test.)


Sunday, April 7, 2013

White Chocolate Raspberry Scones

White Chocolate Raspberry Scones


These scones, or slight modifications of them, have been happily consumed by family, friends and coworkers over the last few years. They're moist, not overly sweet and really, who can say no to free food? They are also simple to make and take less than an hour (~45 minutes or so). One summer morning I woke up with a hankering for scones and whipped up a batch before I went to work. They made a tasty treat during our 9 am meeting. One coworker noticed they were still warm and now assumes I get up extra early to bake goodies for work.

Ingredients
1-1/4 cups all purpose flour
1/2 cup wheat flour
3 tsp baking powder
1/4 cup sugar
1/2 tsp salt
1/3 cup shortening
1 tsp vanilla extract
2 eggs
1/3 cup heavy cream (I've also used 2% milk with acceptable results)
3/4 cup white chocolate chips
1 cup raspberries (frozen ones work best)
powdered sugar (optional)

1. Preheat oven to 350ºF. Grease a cookie sheet or line with parchment paper.
2. Combine flours, baking powder, sugar and salt in a large bowl.
3. Combine eggs, cream/milk and vanilla extract in a small bowl and whisk until well mixed.
4. Cut shortening into 1/4" pieces and add to dry mixture. Combine with pastry blender (or 2 forks) until the mixture is crumbly. Don't use your hands as the heat will melt the shortening.
5. Gently fold raspberries and white chocolate into the shortening/flour mixture.
6. Slowly add the liquids and mix until a stick dough forms.
7a. If you'd like nice triangular scones, roll the dough out on a floured surface and roll out into a long rectangular strip. Using a pastry knife, cut into 12 pieces.
7b. If you're feeling lazy or don't care for triangular scones, drop 2 - 3 tbsp of dough directly onto the cookie sheet/parchment paper. I've used an ice cream scoop and get 9 - 10 scones.
Note: I was looking for an almond scone recipe and saw an interesting note to freeze the unbaked scones on the parchment paper, place into zip-lock bags and bake them when you're in the mood for scones. There is no need to thaw, just bake a few minutes longer. Though I haven't tried it, it's certainly nice to know. 
8.  Bake for 15 - 20 minutes.
9. Cool and dust with powdered sugar if desired.
10. Enjoy with a cup of tea or coffee.


Saturday, March 30, 2013

Roasted Tomatillo and Pepper Salsa

Roasted Tomatillo and Pepper Salsa


I really love salsa and with the exception of pico de gallo and mango cucumber salsa, never attempted to make it at home. You walk into a super market and there is usually a decent selection of salsas made fresh or in jars that can be stored in your pantry for consumption at your earliest convenience. So if salsa is so readily available, why make your own? Why not? While growing my own tomatoes, peppers and tomatillos in the PNW is challenging, making your own salsa is not. I'm quite ashamed of myself for not really knowing what a tomatillo is and making my first batch of salsa only weeks ago.

Don't get me wrong. I've seen tomatillos at the super market before. I've even asked someone I was with what the green tomato-like vegetable with the odd looking skin was. They simply replied, "That's a tomatillo." Well of course, the sign says, "Tomatillo." What I wanted to know was what was it, how it tastes, what do you do with it? Once again the Wikipedia saves the day. The tomatillo is a fruit from the nightshade or potato family and is an important ingredient in Latin American green sauces. In addition to green and yellow, there are also purple and red varieties which are sweet rather than tart. 

This recipe is based loosely on several recipes I've seen on the internet (The Yummy Life and Inspired Taste). What I love about this is you can easily make modifications based on what your tastes are. It takes about 1.5 - 2 hours to complete.

Ingredients
~1.5lbs tomatillos (I used 11 of varying sizes)
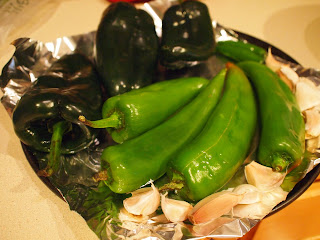
6-7 peppers that meet your capsasin levels (I used 3 Poblanos, 4 Anaheims and 2 Serranos and would classify it as medium)
6 garlic gloves
1 tbsp lemon juice (I generously squeeze directly from the lemon)
1/4 cup cilantro (optional)
salt to taste

1) Preheat oven to 450ºF.

2) Remove and discard the husks from the tomatillos. Wash the tomatillos (they may be sticky), place in a baking dish and set aside. You can use a baking pan but I find a baking dish with raised sides works well to hold the juices released during the roasting process and nice container to blend things in. 


3) Line a baking sheet with foil. Wash and dry the peppers, and then place them on the baking sheet with unpeeled garlic cloves. 
Note: This is my lazy way to roast garlic. I prefer to cut the tops off garlic, place in a foil bowl, pour some olive oil on top and roast at 450ºF for about 30 minutes. The cloves can be easily squeezed out and used for a variety of things like spreading on bread.

4) Place the tomatillos and peppers into the oven and roast for 45 minutes. After 15 minutes, carefully rotate the peppers so the roast evenly. 
Peppers about 20 minutes in

5) After roasting, your peppers should be blackened and soft. Remove the tomatillos and peppers from the oven and allow to cool.
Roasted peppers
The tomatillos became soft and some leaked into the bowl

6) When the peppers are cool enough to handle, remove the stem, seeds and skin. If you grab the stem and gently pull, most of the seeds come out. I slide the pepper down the middle and scrape any remaining seeds with my knife. The skin should come off very easily after roasting.
Note: I highly recommend wearing gloves. I've had capsaicin from hot peppers burn my fingertips even after vigorously washing with soap and water. The last thing you want is to rub capsaisin in your eyes hours after handling peppers. 

7) Combine the tomatillos (skin, seeds and all), peppers, garlic, lemon juice and cilantro (if using) in a food processor, blender, or bowl if using a hand blender. Gently pulse until blended. I like my salsa with some texture so I pulse until the big chunks are gone.

After removing the seeds, I placed all the ingredients into the tomatillo dish. I didn't have any cilantro for this prep so it wasn't added but I liked the flavor of the salsa with the cilantro included.
8) Add salt to taste.
I made enough to fill a jar!

Sunday, February 24, 2013

Chinese BBQ Pork

Chinese BBQ Pork (cha siu)

Growing up my family seldom ate out. The majority of meals were cooked at home so my mother knew exactly what she was putting into the food and it was much more cost effective. Sometimes she would pick up some fresh rice noodles, sprouts and some Chinese BBQ pork a.k.a. char siu so she can whip up a simple stir fry at home. Less than $10 to feed a family of 3-4 for lunch. The char siu was purchased 99% of the time. She'd walk through Chinatown peering through the window in search of freshly made cha siu, indicated by the dripping juices, before asking for a half fatty/ lean piece. I no longer have cha siu on near weekly basis since I'm less than enthusiastic to make a 30 mile drive down to the International District and peer through several windows until I find the perfect piece like my mother. A while back a friend posted a picture of homemade cha siu and I immediately asked for the recipe. It had been bookmarked for quite some time but I haven't had the time to make it until this weekend. I picked up some pork belly, followed the recipe and had some tasty cha siu at the end of the day. If I were to make this again, I'd go with a leaner cut of pork (like the tenderloin) and adjust the cooking times as needed.

Chinese Roast Pork / Chinese Barbecued Pork (recipe from Appetite for China/The Chinese Takeout Cookbook with my notes/comments in blue)
Serves 4 to 6 as part of a multi-course meal
  • 1 pound pork belly, unsliced with skin trimmed off
  • 2 tablespoons Chinese rice wine or dry sherry
  • 2 tablespoons dark soy sauce, or substitute regular soy sauce (I used regular soy sauce since I was out of dark soy sauce. My cha siu was less intense in color)
  • 2 tablespoons white granulated sugar (Perhaps brown sugar would work with the regular soy sauce to add color)
  • 2 cloves garlic, minced
  • ½ tablespoon hoisin sauce
  • ½ teaspoon five-spice powder
  • 2 tablespoons honey
  1. In a large bowl, mix together the rice wine, dark soy sauce, sugar, garlic, hoisin sauce, and five-spice powder. Rub the pork belly with the marinade mixture and marinate for 2 to 3 hours in the refrigerator. 
  2. Preheat the oven to 325°F. Rub the excess marinade off the pork belly (but don’t rub it all off!) and place in a roasting pan. Brush the top with the honey. Roast the pork for 40 to 45 minutes, flipping the pork belly over half-way through and brushing honey on the other side. The pork is done when the outsides begin to crisp and blacken, and the center of the pork belly strip feels firm. (I checked on my pork after 40 minutes and while it was cooked, the outsides weren't getting crispy. I brushed on a coat of brown sugar and honey, turned the temp up to ~400ºF for 5 minutes to get the pork to brown a bit better.)
  3. Remove the pork from oven and let it cool for a 5 to 10 minutes. Transfer to a cutting board and cut into thin slices. Arrange the slices on a plate and serve, either plain as part of a multi-course meal, or with rice or noodles.
Resting on the cutting board
Dinner = Cha siu with Shanghai bok choi over white rice


Saturday, February 9, 2013

Starting the lunar year off with almond cookies

Almond Cookies


Last year I stumbled upon almond meal/flour at a local grocery store and picked up a bag despite the cost. As with all things I'm unfamiliar with, I turned to the internet for answers.

What is almond flour? 
Almond meal/flour is basically skinless, blanched almonds that have been finely ground. You can make it at home just as long as you don't grind it so long it becomes almond butter.

Is it good for me? 
It's a great source of protein, fiber, vitamin E, magnesium and low in carbohydrates. It's also gluten-free.

And what delicious treats can I make with it? 
Pancakes, cookies, cakes, muffins, breads, substitute for breadcrumbs in meatballs, etc. 

Although there were countless recipes online, I opted to try the almond cookie recipe on the back of the Bob's Red Mill oat flour I had. You can make gluten-free cookies if you use the gluten-free oat flour. Oat flour is gluten-free but may be milled in a facility that has gluten products. I've baked these several times to take to work or bring to soccer games and I never have problems with leftovers. Since I'm home for Chinese New Year and I didn't have time to make my ninja cookies (sorry cousin), I made a double batch for my folks.


Almond Cookies (recipe from Bob's Red Mill with my notes in blue, makes 2 dozen cookies)
1/2 cup butter
6 tablespoons maple sugar or light brown sugar
1 teaspoon vanilla
1 cup almond meal
1 cup sifted oat flour
1 tablespoon powdered sugar (for dusting, if desired)

1) Preheat oven to 300ºF. 
2) Grease cookie sheet; set aside. (I use parchment paper so I can skip greasing the cookie sheet)
3) With a hand mixer, blend the butter, sugar and vanilla extract until creamy. 
4) Add the almond meal and oat flour and mix until the dough sticks together.
5) Form the dough into 1-1/2 inch balls. (I use a small (1" diameter) ice cream scoop which makes the process quick and keeps my hands clean)
6) Place them on the prepared cookie sheet and bake for 30 - 35 minutes. 
7) Cool cookies completely before enjoying. (Sift powdered sugar on top, if desired)

Ingredients
Creamy mixture of butter, sugar and vanilla extract
I mixed the flours with the butter/sugar mix with the electric mixer initially and finished the job off with the spatula. Since almond flour is on the pricey side, I make sure I scrape up every last bit.
I typically use a 1" ice cream scoop to seed things up but my parents only had a 1-1/2" scoop which made for slightly larger cookies.
They don't spread when baked.
I opted to hand roll 1-1/2" balls for the last tray and baked them for ~25 minutes. They probably could have gone for 30 minutes but they turned out pretty nice.
The little guys in on their way out the oven
Ready to be shared :)